A Piece of Cake Designs A Piece of Cake Designs home FAQs view cart

Monday, 29 July 2013

Guest Designer Share - Kim Price 'Boogie Board' - July Main Cake Kit


Guest Designer Share with Kim Price using the July Main Cake Kit. 


You can still find some of our July Main Cake kits in our store here

******************

Today we are here with an update from our July Guest Designer Kim Price. Here is her first stunning layout with the July Main Cake kit and what she had to say about her layout: 


I was so excited to receive my A Piece Of Cake Designs kit in the mail just a few days ago and couldn’t wait to begin. It’s such a versatile kit where you could go completely feminine or fun and ultra modern with your creations.
 
For my first layout I’ve used lots of bits and pieces starting with the Studio Calico printed vellum paper which I distressed by adding some tiny tears and curled the edges and then added layers from the papers in the kit. I love to include things such as the sample strip from the bottom of the papers, barcodes and collection titles in my layers, in fact anything goes! All these little things add so much personality and interest to a page.


I’m also a big fan of torn washi tape, and I was so thrilled to find a roll in the kit – instant distress! Adding your photograph and layering one of the wooden polaroid frames on top gives lots of dimension to your layout as well as creating focus. The giant sequins and paper flower really finish the look of the whole page adding a feminine touch and lastly I tore the strip of white cardstock from the bottom of the page adding black cardstock for a blast of contrast. This was an afterthought (shhhh, dont tell anyone!) but it works really well and gives so much balance.
 
Thanks for dropping in, I hope you find some inspiration from my creation!

Friday, 26 July 2013

July Guest Designer Revealed - Kim Price

Hello everyone,

Today I am so very pleased to share with you our July Guest Designer who will be working with our Main Cake Kit for this month. When I was designing this kit and gathering the papers and supplies I had a feeling this kit would be right up this lovely lady's alley! I can't wait to start sharing sneaks with you all of what she has been creating with this kit :)


Hi, my name is Kim Price and I am so happy to be designing for A Piece Of Cake Designs this month. 

I live on the Central Coast NSW with my husband and two grown up teenage daughters and have been scrapbooking and papercrafting for over 10 years although I have always had a flair for the arts. I am a huge fan of mixed media and often incorporate this into my creations. 

Thank you for dropping by and I hope to inspire you in some way.


*****************

You can see some of Kim's lovely work on her blog at:


Looking forward to seeing both Kim's work with our July Main Cake Kit and don't forget there will be plenty of shares from the lovely Ebony who is using our July Cupcake Kit!

Take care, xxx


Wednesday, 24 July 2013

Guest Designer Chantal's last share - A Card!


Well today I am here to share with you Chantal's last share with us before I introduce our July Guest and we start those new kit shares :)

Here is what Chantal has to share with us, I totally believe that she has hardly anything left from this kit! So amazing :)

**************


There was seriously like no paper left, about 5 EP stickers, hardly any letters and two pegs and a die cut camera.  That's pretty much it!! :D

I've totally enjoyed this kit so much and I had no idea that kits could possibly be this fun to use (I've used a few in the past, but this just blitzes them to bits!!!).

My card is using up the little bits that I had left and I've added a toothpick from my stash underneath the Basic Grey Hipster Wood Die Cut mustache for a bit of fun - to look like a fun photo prop.


I swiped a bit of ink onto the white cardstock to add a little more vibrancy, to blend in with those awesome patterned paper colours. :)

So I've re-used an off-cut from my "Radical Sk8ter Girl" layout - the negative alpha sheet on pink patterned paper with assorted patterned paper strips fanning underneath. :)

Here's a photo of the inside of the card...


Because my card was on black cardstock, I thought it a nice idea to stick a small rectangle of white cardstock inside and using washi tape as an extra adhesive, but mostly as a decorative border, covering the edges!  I think it finishes it off quite nicely!

Well that's it for me!  Thank you SOOO much for this wonderful opportunity, I am so very grateful!  I hope that you have enjoyed seeing my creations using your awesome and versatile kit! :D

Thanks again and cheers!

Chantal :D
xo


**************

Thank you so much for Chantal for your amazing creations using our June Main Cake Kit! I am truly amazed with the detailed pages you have been able to create! xxx


Monday, 22 July 2013

July Release ... images and contents videos :)

Hey APOCD friends!

Well tonight is the July sale night and I have lots of release images to now share with you. Things have been busy busy with myself meeting other deadlines and also waiting on new release stock for these kits, which is why these images have not been shared sooner!


You can hop onto our site tonight to purchase our July releases
(click image below to visit site)


The Main Cake Kit, yummy yummy! 


A kit contents video....watch it to find out what is in the July Main Cake kit :)


The July Cupcake Kit, this one is a fun & bright kit!


And some detailed images


Cupcake Kit contents video :)


This months flair are one of my favourite releases! Hope you like them as much as I do!


This set is only available when you purchase a July Cupcake kit.
 Only available in the July Main Cake Kit.


I am very much looking forward to our sale night tonight! Hope to see you there :)

I am already planning the August kits as there are so many nice new goodies coming out at this months CHA! You can have a look at this site to see sneaks of some of the new manufacturer releases. You never know, a range you love may feature in an APOCD soon :)

Our July Guest designer will be announced really really soon. I can't wait to see what this fabulous lady does with the July Main Cake kit :)

UPDATE: There are only 3 of the Cupcake kits for July left, to nab one of the last few click the image below to go to our site


Wednesday, 17 July 2013

Guest Designer Share - Chantal Vandenberg


Here is the final layout share from this months guest designer Chantal. Thankfully, this will not be her last share this month as she will be sharing a card with us really soon too :)

Here is what she had to share today:

Here is my fourth layout, "A Country Escapade".  This kit is so versatile and I hope I have displayed this in the four layouts I have completed. :)


Simply omitting some of the brights like pinks and yellows, gives this kit a more "natural vibe"… perfect for outdoorsy shots like these.  Here I've documented a fun and adventurous getaway with lots of snaps and journalling along the way.


I've given the sewing machine a work-out again with this layout!  I really needed it to flatten my spiral flowers because they were out of control… the UHU glue stick just couldn't handle their springiness Lol!

So I've basically just created these flowers by freehand cutting out some circles and then cutting inwards around and around in a spiral pattern (like a snail shell).  Super easy and fast - all up it took about 2 minutes for them all.  Some skinny paper strips for their stems (using every last scrap here!) and I cut out three leaves too.  The flowers were glued down and gently moved around 'til they looked funky and then out came the beast (the Janome sewing machine) to make sure they don't move around!  ;)


I topped off these flowers with a couple of Cherry Flairs and a fussy-cut flower form AC Amy Tangerine "Yes Please" paper popped onto foam tape and finished off with a string bow. 


I decided to machine stitch other element too (while I had the machine out) like the white cardstock onto the kraft cardstock base, The Jillibean Soup polaroid white frames, the focal photo and the large panel of woodgrain patterned paper.

The Basic Grey Hipster wooden die cuts tied in so well with their natural finish.  The diamond couldn't have more perfect for this layout about "a journey at the rocks" and it looks great with coordinating patterned paper underneath, layered on top of that cute clipboard.

The MME Tiny Word stickers, along with Echo Parks alpha and elements stickers really add some more depth and interest to the overall layout.  I adhered a tiny silver star sequin onto the sticker "Today Was.." under the selection "Awesome"… as opposed to good, bad and okay.  Lol!  The thing is, these little details really add to the layout and may not be noticed upon first inspection and that's what I love about scrapbooking.  I love adding visual "layers" and journalling "layers".

This layout does have an example of my journalling layers too - I've shared the details of the day, the stories of the day, as well as adding some fun captions about each photo.

Well I hope you like this layout and my overview!  :D

I've got a card to share with you next.

Have a great one!

Cheers,
Chantal

Saturday, 13 July 2013

Guest Designer Share - Chantal Vandenberg


Here is yet ANOTHER AWESOME share from our Guest Chantal. Honestly, I am just blown away at her ability to really use up a kit! Including the negatives from the sticker sheet :) 

Here's what she shared with us:


For my large rectangular double photo matt I cut around the black alphas from the Echo Park Alpha Sticker sheet, then gently peeled the top negative layer of stickers, leaving the positive (alphas) on the backing sheet for later use still.  I adhered the negative sheet straight onto Webster's patterned paper for a nice funky contrast, which ties in well with the skateboard and theme. :)

I then adhered double sided tape around the outside edges of this funky matt and stuck lots of strips of patterned paper around to make a funky frame.  I tore off every strip to leave the white torn edge exposed (looks edgier that way… Lol).  

Once this was done I mounted the whole lot onto foam tape and adhered it to my Kraft cardstock background which has in turn been mounted onto a black cardstock background (oh yes, I love my layers!).

The two focal photos where additionally framed with patterned paper, and I used decorative scissors to make a nice funky edge.  Then the photos where adhered to the funky matte base.  The three other photos have been framed by using the already funky Jillibean Soup Polaroid white frames.  I love these frames to bits!!  All three were adhered to the right of the focal funky photo matt - the middle photo was popped up onto foam tape.


Extra details are; machine stitched strips onto Kraft cardstock to create movement - along with doodling, paint and string; I've used some packaging on the top left and bottom right of my layout (how appropriate was the "Life in motion" bit of packaging?!) from the Webster's Pages Polka Dot Bows packet; my title includes the MME Tiny Word Stickers, Basic Grey Hipster Die Cut word and EP's alpha stickers - adhered onto white cardstock, doodled around and cut out; I've used some more Candi Dots and of course a gorgeously sweet Cherry Flair which reads "Love this Photo". :)


 Oh and if you spy three butterflies - that's because two butterflies are from the fab Echo Park Alpha Sheet (along with sooo many other sticker goodies!) and the other one at the bottom was punched out of patterned paper (I just so happened to have an extremely similar butterfly punch in my collection of like, 5 punches… seriously!  :D  Love it when that happens!


This layout was a total joy to create… I am loving this kit so much!!!

Please stay tuned for my final layout and a card!

Cheers,
Chantal 
:D


Wednesday, 10 July 2013

Guest Designer Share - Chantal Vandenberg


Today I am here to share with everyone another fabulous layout from our Guest Designer Chantal Vandenberg. Chantal was using our Main Cake Kit this month and wow, let me tell you, this lady knows how to work patterned paper!!

Here is what she has to share with us :)


Everything on here is from the kit and APOCD (apart from the machine stitching, adhesives and ink).

Here I've gone for a more graphic look to showcase these three photos and the totally gorgeous patterned papers and super cute Jillibean Soup polariod frames.

So basically after cropping my photos to size, I took some paper strips which were already cut up from my first layout and started from there by adding extra bits and pieces to jigsaw everything together onto a cropped piece of black cardstock.  

Make your paper stretch further by cutting the paper to be layered underneath this cropped black cardstock block by cutting long strips of patterned paper, adhering them underneath the edges and cutting the corners on the 45.  I have machine stitched each layer of paper and even the photos - not only for decorative effect by the extra sturdiness and flatness this provides can not be ignored!  It's such an easy and effective technique - particularly for this graphic style. :)


My title has been adhered directly onto patterned paper and fussy cut out.  I created the curve on the title by drawing a free hand curve onto a piece of scrap paper, cutting this out and using it as a template when adhering the alpha stickers.  This provides a "break" from the rigid straight lines too. :)  I've popped both title words onto foam tape for a bit of dimension.

I've used six pieces of Basic Grey's Hipster Wood Die Cuts; I've strung three pieces though some string and stapled them into place...


Plus I've used two words for my subtitle and a cute finger pointer which points to that yummy Cherry Flair, aptly entitled "All Smiles" from the 'Wonderful Girl' set!

I've fussy cut those funky flowers from AC Amy Tangerine "Yes Please - Bundle" patterned paper and layered them onto of each other with foam tape and over the top of a single doily, which has been cut into three parts.

The newsprint Candi Dot embellishments give the perfect finishing touch, as do the pretty Star Sequins which I've scattered on either side of my title. :)

I'll be back soon with more to share!!!  Yay!

Chantal :D

Sunday, 7 July 2013

More ideas with watercolours!

Hi again!
I thought I would show you another easy way to incorporate using the cool "Crayola water colour paint set" in your layouts!

                                      This time it as easy as painting squares!!!


To start draw yourself a grid, I used grey lead pencil  first. Then inside each grid square start by choosing a colour and then you will need to slightly tilt your page forward while with that wet brush you make a stroke horizontally the length you want it. Now move your brush down so that it is directly underneath the last stroke but just touching the above one and do another stroke. Now you can add more paint each time or just use the brush with water. This means even brush stokes.Keep going until your square is complete. The watercolour will always stop at the end of each stroke ( no drips). If it pools at the bottom you can carefully wipe with an edge of a wipe or tisssue.                  
When your squares are dry go in and add your black pen lines. Then smear some white paint, texture paste, or gesso randomly over your painted squares. I use an old credit card to do this.
I have then used a "Bo Bunny Scratched stamp" and stamped some randomly on top of my squares with archival permanent ink. I then also used a dotted stamp with some orange stazon ink.

Next add your photo. Add in a strip of the washi tape from the kit. Cut from your papers the "captured" word and I have torn a piece of dotted lines from the "pebbles inc. stickers" and added that also. Also from your patterned papers cut the the word today and add to your layout.
Add in some of the wooden veneer circles and text circles. Punch out some small stars from your various patterned papers that match your colours you painted with and add those.

Add your title. I have used the sticker words from the "jilliebean soup" stickers in the kit and then wrote the rest as journalling. Finish off with some doodling and there you go! Another easy way to use water colour paints on your layout! You could paint any shapes/ designs you like...have a go! It's fun!!!!


Back soon! Eb x

Saturday, 6 July 2013

Guest Designer Share - Chantal Vandenberg


The lovely Chantal Vandenberg 


Chantal worked with our June Main Cake kit which is now sold out in our store. Here is what she had to say about her first layout. 


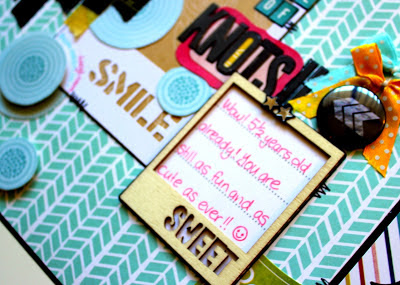
My first layout that I have created is called "At a Rate of Knots!" and I had such a lovely time using the gorgeous mix of patterned papers from the Cake Mix!


I primarily used the reverse side of Fancy Pants "What a Wonderful Day" strips patterned paper (cropped) and adhered this slightly to the left of a full sheet of black cardstock.  I took three polaroid die cuts from the Jillibean Soup Placemats - White Frames 12"x12" sheet and adhered some small rectangles of contrasting (yet beautifully coordinating!) patterned papers underneath, making sure to cover the "smile" words underneath the bottom frame.  

I cut out some circles from Echo Park's "Here & Now" - Feathers  paper (the underside - you can see I used the yellow feathers side on the far left polaroid frame) and popped some up on foam tape too for dimension and to give a bit more dynamic.


Next came some Black Ruler Washi Tape.  I simply did an easy matt for my photograph by tearing off and adhering the tape vertically, making sure the length and width of the tape "matt" will be visible from underneath the photo (so in other words, it's slightly larger!).

I adhered four pieces of Basic Grey's "Hipster" Wood Die Cuts to my layout - the speech word bubble, polaroid frame (in which I journaled inside) and two little banner flags, which have been strung together with string and stapled into place.

I love the cute fonts and stickers from Echo Park's Here & Now Alpha Stickers sheet, these sheets are more than generous and so perfect for countless creations!  Here I've mixed up the tiny letter stickers' colours and added contrasting patterned papers to the little spaces in the letters (such as "o" & "p") to funk it up even more… so much fun! 


Other bits and pieces I used are; Prima "Camera" - metal paper clip (clipped onto the bottom right of the photo), Webster's Pages "Modern Romance" - three polka dot bows (one as a "corner" on the top left of layout, and the other two above an exclusive Cherry Flair.. love it!), Newsprint Candi Dot embellishments and Silver Star sequins.

I had a ball creating this layout and absolutely everything on here is from the kit (with the exception of the adhesion devices like glue, foam tape & staples and the gel pens. :)


Thank you so much Chantal for sharing in so much detail your first layout and some of the techniques and processes you undertook. I think this share will really inspire friends of APOCD xxx


Thursday, 4 July 2013

Water colours and stencils....

Hi everyone,
I am totally in love with this month's kits!!! Awesome colours, embellishmnets......so many great things to mention! What kit did you buy??

This month I was lucky enough to have the cupcake kit to play with.

The water colour paints are to die for, honestly I was so impressed by the creaminess and the vibrancy of the many colours!!!


So I know for some of you the thought of water colour paints may be a bit foreign or even intimidating! So for my first layout I just wanted to show you haw you can just use any of your favourite stencils and then use the paints to colour them in!


So I have used a "crafters workshop" stencil and a black pilot permaball pen and traced the stencil design onto my background cardstock. You need to use a pen like this so that it won't smudge when you add the water colour paints.
I then selected 5 colours to compliment my layout and roughly coloured each of the chevron patterns in. So easy!!! To use the paints you can just use a wet brush and stir the water into the paint until it becomes activated and creamy. Or you can spritz with a water bottlle.


Once I painted my pattern and it had dried I added  some texture paste with another stencil and added two smaller photos and used some of the really cool wooden veneer diamonds and the text dots to add interest to my page! I also cut some small butterflies from some vellum and the "hello friend" tag from the "pebbles inc. sticker sheet".
I have added in some old rubon words as you can see from my stash and some sequins from previous kits!


I have used the alphas in the kit for my title and lastly splattered a few blaxk paint spots!
See how easy and fun using the paints can be!? Hope you give it a go!!!1
Back soon with some more layout ideas!
Eb xx
 
A Piece of Cake Designs Blog, All Rights Reserved
Blog Theme by Mod Melon Creative