A Piece of Cake Designs A Piece of Cake Designs home FAQs view cart

Monday, 9 February 2015

Messy Monday with Natalie ...


 How was your weekend?
It's HOT here in Adelaide and we have a few more HOT days coming up too ....I'm not a fan of hot weather ... actually I hate it... but there could be worse things!

So today I'm sharing a page I created with the January Cupcake Kit!

I have forgotten how much I love working with Gelatos!
There are TWO double scoops in the kit - awesome!


For this page, I used them as watercolours by rubbing them onto my craft mat 
first then using a paint brush to apply them to my page.


I then stamped with them by making a puddle of colour on my mat
then stamping into it then straight onto my page. 
I love the way it creates a softer look.
So I hope you are all staying cool - where ever you are!

Have a great day

Natalie May


Saturday, 7 February 2015

Digi Store Saturday ... with Natalie May


One of the boys my hubby works with had a baby last week..... So Trev comes home and asks me to whip up a card! Yep - no worries ... I have the PERFECT papers!

I love the papers in the January Cupcake kit. Double sided and super easy to use.
I'm not one to make baby cards out of soft pastel colours - I'd rather use something
more suitable to the parents so these were great!
 

I had the idea in my head that I wanted to do some paper weaving so I cut a star frame from 
the Teen Embellishment Cut Files set 2 and used it as a frame to put my woven paper behind.

This is such an easy technique and really effective too!


I also cut the LOVE word from Teen Embellishment Cut Files set 1 and used it inside the 
card along with a cut of the baby's name - just for that personal touch!

I hope they like it!

Have a great day
Natalie May

Friday, 6 February 2015

Friday Favorites: Smile


 absolutely loved the January main kit so much. The papers have some beautiful pink and teal tones to them. I was smitten with the Dear Lizzy pack of embellishments.
I had a lot of fun layering the embellishments and using pink.

One of my favorites pages created with one of my favourite kits!


Hope this inspires you.

Thursday, 5 February 2015

THOUGHTFUL THURSDAY - Guest Designer Jodie King


with 


Every now and then you'll come across someone who makes your day with their thoughtfulness. While we were setting our DS up in his unit recently, we came across a lounge suite on Gumtree that was free. The owners wouldn't accept any payment for it, they just wanted to help someone out that needed some furniture. And you know what? It's a really great lounge suite!

I knew straight away that I would send these lovely people a card and some Instant Scratch-its as a small measure of our thanks.


I've been playing with the gorgeous January Cupcake Kit again, and I've pulled more of the bright and happy colours from the My Mind's Eye Jubilee Tangerine collection for this card.


The background came together with some basic paper piecing. I cut multiple 4 x 4cm squares in two different patterned papers and then cut each square in half on the diagonal. I arranged them so that each triangle became part of a larger diagonal line. I then stitched each straight and diagonal line on my sewing machine to give a quilted look.


I've used the Hello 2015 design by Polka Dot Creative from the Digital Store, love Jodie's scripting! I've cut the heart in white cardstock on my Cameo, then coloured it using the Mango Gelato from the kit. I've adhered it to the card base and then stitched around it a couple of times in orange thread. Because there are some fine areas on the heart, it stitches more easily when it's adhered to a solid base.


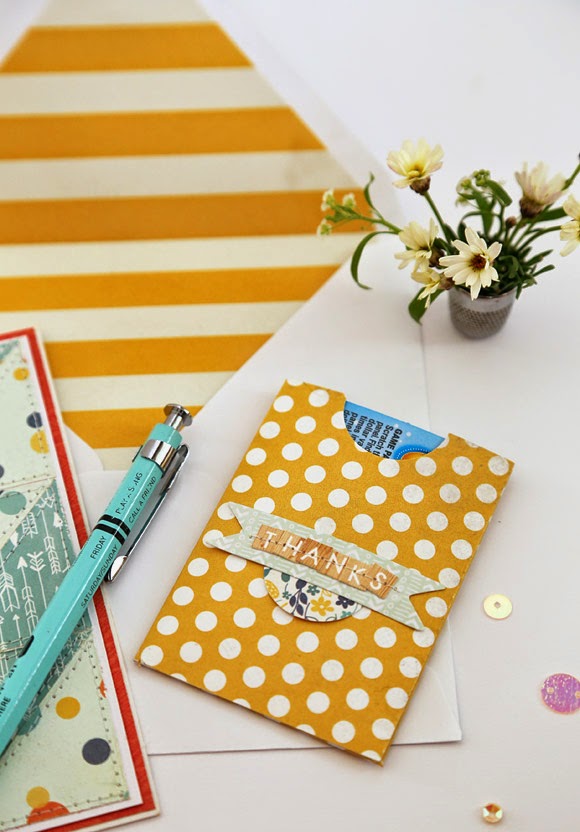
To pretty up my little parcel I used patterned papers from the kit to add a liner to the envelope, and a gift card holder to house the Instant Scratch-Its.


You'll find a bunch of envelope liner tutorials on Pinterest, and they are really quite simple to do but add that extra personal touch. I used a corner rounder at the top to get a clean, straight curve without any stray scissor cuts.

You'll also find plenty of gift card holder templates on Pinterest. I found one that I liked and resized it so that it fit my Instant Scratch-Its perfectly.

A couple of embellishments and a sentiment using the Webster's Pages woodgrain Little Letter Stickers from the kit and it looks as cute as a button!


Now I just need to write a message of thanks in my card, pop in a photo I snapped of the three boys on their new lounge suite, and send this little parcel off in the post!

Thanks for dropping by today,

Jodie

Tuesday, 3 February 2015

TUTORIAL TUESDAY - Guest Post, Jodie King


with


Hi friends, it's Jodie here today and I'm so excited to bring you my first post as Guest Designer for APOCD's January Releases! I've used the Cupcake Kit and a January release Cut File & Brushes from the Digital Store.


Our DS is about to start Uni, and this weekend he moved out of home so that he can study in Brisbane. I wanted to create a layout to celebrate this incredibly exciting time for him, a time when the whole world just seems to open up and anything is possible.


The January Cupcake Kit has two gorgeous Double Scoop Gelatos, and I've used the Mango Gelato in three ways to create my background. Here's a quick step by step on how I've created it.


Start with a piece of white cardstock and prime it with Gesso. Priming allows the Gelatos to blend more easily over the surface and gives a smoother finish, and it also prevents the cardstock from curling and distorting quite as much.

Allow the Gesso to air dry. When dry apply the Gelato across the page where you want the most vibrant colour to be. As you can see you don't need to be super neat with this step at all.


Take a baby wipe and rub over the Gelato to blend the colour, this creates a watercolour effect. When you have blended where you'd like the most vibrant colour, go over the edges with a clean section of baby wipe for a lighter shade, blending back to the white cardstock.


To use your Gelato to create a droplet or splatter effect, put a very small amount of water into a glass or small container. Rub the Gelato in circles on the bottom of the container to release the colour into the water. This may take a few minutes, but the more you rub the more concentrated the colour becomes.

When you have your desired colour, use a small paintbrush to apply splatters to areas of your background.


The final element to our Gelato background is to use a background stamp for subtle visual texture.

For this technique you will need a background stamp, a Gelato and a spray bottle of water (I've used a background stamp from my stash).

Apply the Gelato directly to the stamp in random sections (to create an imperfect edge). It's okay to get a fair bit of colour onto the stamp as it will be a darker layer over the already-coloured background. Spritz the stamp with water and let it sit for a minute while the Gelato activates, then stamp it on the already coloured section of the background. Repeat to create a random pattern.


And here's the background with our three Gelato techniques.


I've pulled a lot of the brighter papers and embellishments from the kit to match the vibrant Mango Gelato background. These pennant die cuts from the My Mind’s Eye Jubilee mixed bag come together as a quick and easy banner.


I've cut the word "Celebrate" in black cardstock from the Clink Clink Cut Files and Brushes. It doubles as my title and also as part of my journalling. I was curious if the scripty font would cut cleanly on my Cameo and I'm super happy with how it turned out - a beautiful clean cut.


There are lots of woodgrain elements in this kit, some of my faves being the Studio Calico Heyday frame stickers and the Jillibean Soup woodgrain frames.


To finish the layout I've added some black ink splatters using Mr Huey's (from my stash) and a few of the metallic sequins from the kit.

Thanks for dropping by today!

Jodie

Monday, 2 February 2015

MESSY MONDAY - Anna Allan; Best Ever Bubbles!


Hello APOCD friends!
I am back today for another layout share using the January Main Cake Kit!


I have used the Kraft cardstock from the kit and got my scissors out and snipped away at one of the papers to create my background. 
I also got out the texture paste again and used a Tim Holtz 'bubble' stencil from my own stash to randomly apply a bubble like effect to my background. When it was dry, I got some pink ink (Flamingo from Studio Calico Colour Theory I think) and dabbed my finger on the ink pad and then swiped over parts of the texture paste to add a tinge of colour to it.


I am just loving how easy it is to create with this kit!
All happy smiles right here!


Anna :-)


A Piece of Cake Designs Blog, All Rights Reserved
Blog Theme by Mod Melon Creative