A Piece of Cake Designs A Piece of Cake Designs home FAQs view cart
Showing posts with label silhouette. Show all posts

Saturday, 5 September 2015

Digi Store Saturday- Belinda Griffin: How Sweet It Is

Hi Everyone!


Belinda back with you to share another layout created with the fabulous current cupcake kit, featuring one of the fantastic phrase cut files available in the digi store here.

As you can see I kept this layout nice and simple, I really wanted the title to be the main feature and take over most of the page! I use a variety of the papers from the kit to back behind the cut title, creating a fun bright title.
I then used some of the pink washi tape from the kit (I like the cut the edges of mine into little banner style ends) to create a base for my sub title. I cut around my photo to complement the edges of the title to again make sure the title really remained the focus.
I loved the bright stickers from the kit so made sure I included a few of those around the page, and of course those adorable wood veneer. Finally, some splashes of pain (some of which I ended up turning into a painted heart to fit the sentiment) and the page was done. Quick and simple.

Thanks for stopping by today!


Friday, 13 February 2015

FRIDAY FAVOURITES - Guest Designer; Jodie King


with


Hello, Happy Friday, and welcome to Friday Favourites! It's Jodie with you today with my third project using the gorgeous January Cupcake Kit.

Does anyone else have trouble getting their man in front of a camera? Mine really does not like his photo being taken, and so rarely makes it into any of my scrapbook pages. I snapped this pic while we were at lunch on a recent holiday and I think it's kinda cool. So he finally gets to have a layout (probably the first ever) featuring just him, hence the title Hello Handsome.


Some of my very favourite pieces from this kit are the woodgrain and navy striped papers, the navy embellishments ('best ever' and 'that was so fun' tags), the gorgeous flair buttons, the cloud die cut, and the die cut shields. I've also saved the scraps of my favourite yellow polka dot paper from my last project, and seriously, who doesn't love a turquoise doily!

Hello 2015 is one of my favourite digi files from the Digital Shop January Releases and I've used it both as part of my title and as a background layer for my layout.


I duplicated the word 'hello' from the digital file into a grid pattern on a Silhouette Studio page, and cut it on my Cameo from white cardstock. After trimming it to size I adhered it to another piece of white cardstock and machine stitched the edge in white thread. By using all white products it adds visual texture to the background without becoming too busy for the other bright colours used in the layout.


There are quite a few black & white doodling elements to the My Minds Eye Jubilee Tangerine collection, including this smaller shield. To cut back on some of the busyness of the geometric lines, I've used my Mango Gelato from the kit with a watercolour brush to colour parts of it in.

The antler flair is just delicious and I've used it to reinforce the masculine feel to this page.

To build the title I've used one of the 'hello' scripted words that was left over from creating the background, and simply recoloured it.


One of my favourite things to do on a layout is to fussy cut.. I'm always looking through patterned papers to see what I can cut out. Once I had tucked in the cute cloud die cut, of course I needed to cut some hot air balloons from one of the 6x6 papers.


Even after three separate projects there's still so much product in my Cupcake Kit. The only things in this layout not included in the kit are white and blue cardstock, a few enamel dots, some twine and a tag that was a piece of memorabilia from our weekend away.


And that brings to an end the sharing of my Guest Designer projects at A Piece of Cake Designs. I'm so thrilled to have been creating with the Cupcake Kit this month, and can't thank Raquel enough for having me along.

The kits are always perfectly coordinated and have such a great mix of papers, embellishments and exclusive flair. Can't wait to see the February kit sneaks!

Jodie

Thursday, 5 February 2015

THOUGHTFUL THURSDAY - Guest Designer Jodie King


with 


Every now and then you'll come across someone who makes your day with their thoughtfulness. While we were setting our DS up in his unit recently, we came across a lounge suite on Gumtree that was free. The owners wouldn't accept any payment for it, they just wanted to help someone out that needed some furniture. And you know what? It's a really great lounge suite!

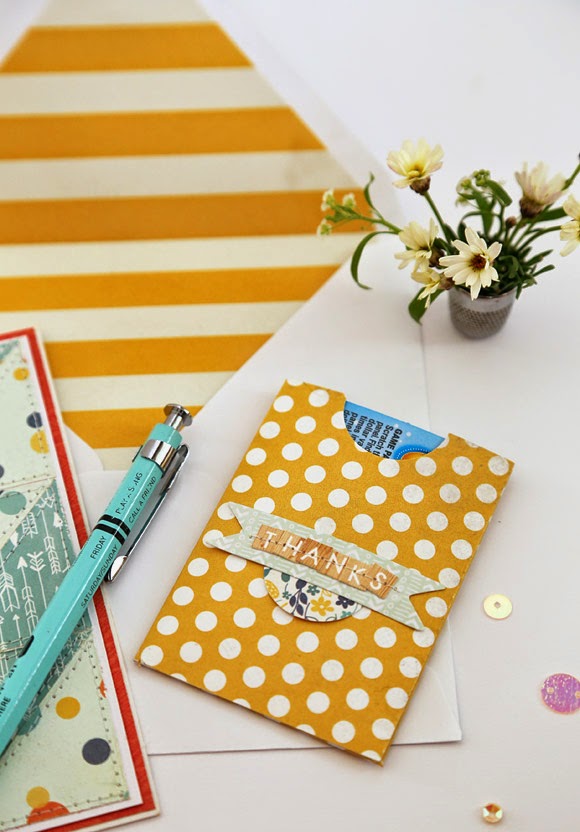
I knew straight away that I would send these lovely people a card and some Instant Scratch-its as a small measure of our thanks.


I've been playing with the gorgeous January Cupcake Kit again, and I've pulled more of the bright and happy colours from the My Mind's Eye Jubilee Tangerine collection for this card.


The background came together with some basic paper piecing. I cut multiple 4 x 4cm squares in two different patterned papers and then cut each square in half on the diagonal. I arranged them so that each triangle became part of a larger diagonal line. I then stitched each straight and diagonal line on my sewing machine to give a quilted look.


I've used the Hello 2015 design by Polka Dot Creative from the Digital Store, love Jodie's scripting! I've cut the heart in white cardstock on my Cameo, then coloured it using the Mango Gelato from the kit. I've adhered it to the card base and then stitched around it a couple of times in orange thread. Because there are some fine areas on the heart, it stitches more easily when it's adhered to a solid base.


To pretty up my little parcel I used patterned papers from the kit to add a liner to the envelope, and a gift card holder to house the Instant Scratch-Its.


You'll find a bunch of envelope liner tutorials on Pinterest, and they are really quite simple to do but add that extra personal touch. I used a corner rounder at the top to get a clean, straight curve without any stray scissor cuts.

You'll also find plenty of gift card holder templates on Pinterest. I found one that I liked and resized it so that it fit my Instant Scratch-Its perfectly.

A couple of embellishments and a sentiment using the Webster's Pages woodgrain Little Letter Stickers from the kit and it looks as cute as a button!


Now I just need to write a message of thanks in my card, pop in a photo I snapped of the three boys on their new lounge suite, and send this little parcel off in the post!

Thanks for dropping by today,

Jodie

Saturday, 8 November 2014

DIGI STORE SATURDAY - Natalie May; Cutting the new digi files


Hi there!

Today I'm going to show what works for me when it comes to cutting the new digi files that are available in store!

How cool are these?

I'm a messy scrapper and never have the room to have my Cameo set up ready to go if I need something for a project so what I do is pre-cut and store for later!


I imported my files to my library and created a folder called APOCD where I knew I could easily access them and keep them all together.

I then opened a new doc and filled the 12x12 with the files I wanted to cut. I put as many on there as I could so that it utilized the paper.


I am using white flat cardstock as it can be coloured and is easily adaptable to any of my projects.
Once I sent it to cut, I went off and did a few jobs and came back to a nearly beautifully cut sheet - I need a new blade (husband has been cutting vinyl with the machine which I now realize has made the blade quite blunt)


To remove them from the mat, I lift the edges with a knife and then use a Couture Creations Lift Off tool to peel the rest up.


I tend to peel off my cuts first leaving the backing on but then use the Lift Off tool to scrape the rest off the mat! Works really well to get your mat nice and clean again!


Once I have them all cut, I store them in a pizza box between baking paper so that they stay flat and are easily accessible.


So that's what works for me!

Everyone is different and I am still learning to use my machine and fine tune my settings!
What settings do you use for Cardstock & Watercolour paper? What works for you?

And how do you store your cuts?
I'd love to hear some suggestions!

Have a great day!
Natalie May

 
A Piece of Cake Designs Blog, All Rights Reserved
Blog Theme by Mod Melon Creative