A Piece of Cake Designs A Piece of Cake Designs home FAQs view cart
Showing posts with label card. Show all posts

Thursday, 5 February 2015

THOUGHTFUL THURSDAY - Guest Designer Jodie King


with 


Every now and then you'll come across someone who makes your day with their thoughtfulness. While we were setting our DS up in his unit recently, we came across a lounge suite on Gumtree that was free. The owners wouldn't accept any payment for it, they just wanted to help someone out that needed some furniture. And you know what? It's a really great lounge suite!

I knew straight away that I would send these lovely people a card and some Instant Scratch-its as a small measure of our thanks.


I've been playing with the gorgeous January Cupcake Kit again, and I've pulled more of the bright and happy colours from the My Mind's Eye Jubilee Tangerine collection for this card.


The background came together with some basic paper piecing. I cut multiple 4 x 4cm squares in two different patterned papers and then cut each square in half on the diagonal. I arranged them so that each triangle became part of a larger diagonal line. I then stitched each straight and diagonal line on my sewing machine to give a quilted look.


I've used the Hello 2015 design by Polka Dot Creative from the Digital Store, love Jodie's scripting! I've cut the heart in white cardstock on my Cameo, then coloured it using the Mango Gelato from the kit. I've adhered it to the card base and then stitched around it a couple of times in orange thread. Because there are some fine areas on the heart, it stitches more easily when it's adhered to a solid base.


To pretty up my little parcel I used patterned papers from the kit to add a liner to the envelope, and a gift card holder to house the Instant Scratch-Its.
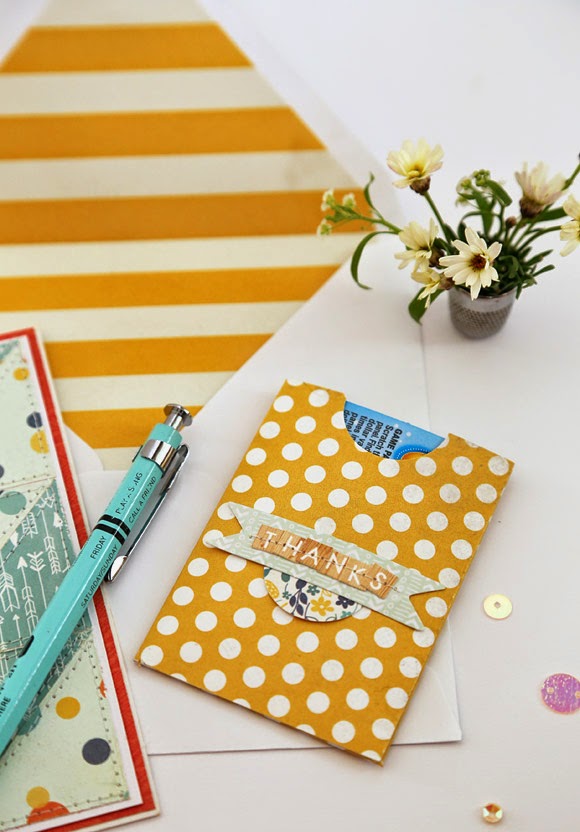

You'll find a bunch of envelope liner tutorials on Pinterest, and they are really quite simple to do but add that extra personal touch. I used a corner rounder at the top to get a clean, straight curve without any stray scissor cuts.

You'll also find plenty of gift card holder templates on Pinterest. I found one that I liked and resized it so that it fit my Instant Scratch-Its perfectly.

A couple of embellishments and a sentiment using the Webster's Pages woodgrain Little Letter Stickers from the kit and it looks as cute as a button!


Now I just need to write a message of thanks in my card, pop in a photo I snapped of the three boys on their new lounge suite, and send this little parcel off in the post!

Thanks for dropping by today,

Jodie

Thursday, 22 January 2015

Thoughtful Thursday with Aimee Dow


It seems very fitting to me that I should wrap up my stint with APOCD on Thoughtful Thursday. I am sad to be going, but in my absents someone new will come and teach you new and wonderful things. I ashamed to say it, but they will probably have better time management skills than me too. I have got to know Natalie, Anna and Felicity much better in my time here. I have no hesitation in saying they are all truly beautiful women and I am proud to call them friends. My highest praise though, goes to Raquel. She is a diabolical genius when it comes to putting together a kit and that's coming from a colour tyrant, such as myself. I have found her nothing, but a pleasure to work with and I am super excited to continue working with her as one of the Jot Girls. If you are reading this and wondering if one day you should apply for the team, I'm here to tell you "do it!", you could not work with nicer or more talented group of people.

Eh, but I'm pretty sure you didn't come here for a recommendation did you? How about we get down to some craft? Today's project is top secret and by top secret I mean - No one tell my husband.


I'll be using the December Main Kit which is currently $26.60. Just sayin' peeps, that's cheap!


I made a Valentines Day Card for my hubby. This is where you all say "aaawwwww". See, card making totally fits the thoughtful topic. I find masculine cards really hard to make. To me, I always default to the same theme - grunge, but as luck would have it that's my hubby's main theme too!


Can I just jump in here and point out how smart I am. The card says "I love you more than words can say" and the shaker window is made out of the dictionary vellum from the kit. Get it... WORDS! I'm pretty proud of that :P

The gold glitter heart cardstock, and twine are from the kit too. You could have used the orange and blue sequins from the kit to fill the vellum pocket, but I kinda already had a theme going with the gold and white.

But wait theirs more! 


I made an envelope with the Amy Tangerine heart paper! Turns out I didn't have quite enough paper left after Tuesdays layout so I had to include the tear strip, but the best thing is that little pink address bar there looks deliberate AND it's the only place it shows on the envelope. FTW peeps!

Well I hate to say it, but that's all I have to write. I hope to see you all in and around the scrapping traps and until see you next, go send some love! Or leave it here in the comments.

Aimee xx

Thursday, 23 October 2014

THOUGHTFUL THURSDAY - Felicity; Lets dance


I am very excited to sharing my first project as a Design team member. I am having lots and lots of fun playing with cupcake kit.

The colours are nice and bright. I will admit, I was a bit 'stand-offish' at first because I don't tend to use brights a lot. I admire all those creativity people that can pull of brights so easy.
This time I decided to start with to cards.

It was a perfect way for me to jump start the creativity and get a feel for the kit I guess. To see the endless possibilities.


With this card I started with the pinks.


NOT INCLUDED: Gold bow, flowers and frame.

I really wanted to get to a feel for the black in the kit.

I used it subtle in my layering.

NOT INCLUDED: Flower and bow.

I hope I have inspired today.


Wednesday, 15 October 2014

DESIGNER INSPIRATION - Natalie May; Cards with the kit scraps

Hi everyone

Using the ample scraps I have left from my main kit, I decided to whip up a couple of quick cards.

Card 1 ... hello ....I love making easle cards. They are super simple and really very easy and most importantly they look really impressive. 


To make this card I cut some kraft to be 4x12. Then cut off a 4x4 piece .. this is my front. I then folded the remaining 8x4 in half then folded one side back on itself.


I added some of the gorgeous orange, pink and white stripe to the front then added a cameo cut, prima flower and some metallic and aqua washi to finish. On the inside you need to create an edge for the front to sit on so a couple of strips of paper and a cameo cut is perfect.


Card 2 .... wishing u loveUsing some black cardstock I folded it to create a gate fold …. 


One side is a little under four inches and the other is about two inches. This just makes this card look a little different. 

I used the gorgeous transparency and cut two pieces to size then stapled them to the black card. (I stapled under where my embellishments would be). 


Using a nail file I sanded off the words from the cork embellishment and added my sentiment using the thickers and studio calico alphas.


Card 3 .... thanksAnother simple card. 


White cardstock folded in half, one small paper at the top with the darker arrow paper at the bottom. 

I added a smaller piece of vellum over the top and wrapped the orange twine around a couple of times  before sticking the whole lot to the front of my card. Again I sanded off the white words as they just didnt suit, added the blue alphas and using foam tape added it to my card. A few of the super cute flower sequins finished it off nicely.


I hope you have found todays post inspiring and that it has provided you with ways to use up those kit scraps!


Thursday, 17 July 2014

She loves to read and tell a story too:)


Hi again everyone,
I am back to share another layout using the June Cupcake kit.


This layout is a photo of my daughter who LOVES
to read!! She is also a great, animated story teller and I really
wanted to document this aspect of her life. 
Often when we go shopping and if she has some pocket money , more 
often than not she goes straight for the book sections
in the stores.


I have like the last layout,
used a tag from the kit to highlight and frame my 
Instagram photo.
I have used lots of different strips of the papers,
as well as the sticker sheet in the kit.
I have added some of my own washi tapes and a past kit flair.


I LOVE this mask so I used a yellow Faber Castell
gelato to add these words to my page. 


Thanks for stopping by. I hope you are enjoying your kit , Eb x

Thursday, 10 July 2014

It's completely up to you...


Hi everyone!!

I am back to share a layout created using the latest cupcake kit!


I know I say it all the time but this kit is my favourite!!!!
I LOVE all the papers in it, the mask is my all time favourite and
the Lindy's Stamp gang mist is totally AWESOME!!
This is my first layout to share! 


As always stitching and a mixed media type background onto
white cardstock. 
I used the Dina Wakely mask with grey 
Faber Castell gelatos as a feature on my background.

I then used the "NOTED" tag as the main feature
to highlight and frame my photo.
I have cut strips from the papers as well as small words
and used stickers from the sticker sheet to embellish 
my layout. 
And I LOVE the cherry fair!!!!!

I will be back again next week with another creation
to share! Thanks , Eb xx


Saturday, 19 April 2014

Designer - Gina Rodgers - Cards..

Hi everyone, I had lots of lovely bits and pieces left in my March Cupcake kit, so decided to make a set of cards with some of the left-overs..


I've used scraps from the Lemon Lush 6x6 papers along with Dear Lizzy stickers, Studio Calico alphas and some sequins.. Some gesso and mist over the paper adds an 'arty' feel and the thread and tiny fasteners add texture


Happy Easter everyone!
Gina x
 
A Piece of Cake Designs Blog, All Rights Reserved
Blog Theme by Mod Melon Creative